
Whether you want to build a website for a client or improve a web-app, bugs will eventually pop up. It’s inevitable.
The real question is not so much, “How can you reduce the amount of bugs?” but rather, “How can you process bugs as fast as possible?” To do so effectively, you need two things:
- A bug tracking process: A way to collect, organize, track, and process bugs.
- A bug reporting process: A way to report, document, and explain bugs as fast as possible.
This is where the combination of Marker and Trello comes in. Let’s start with the first step.
Set Up Your Bug Tracker In Under 3 Minutes
Most bug tracking tools out there are too complex! They require a tremendous amount of customization and represent a huge learning curve for your team.
This is where Trello comes into play.
With three levels of vertical layers (board, list and card) and two levels of horizontal layers (labels and members) for organizing reporting, you have more than enough to set up a powerful bug tracker.
Recommended: set up your Trello bug tracker tool to have a similar list structure to this sample board:
- Reported by team
- Reported by clients (optional: perfect for agencies)
- Accepted
- In progress
- To be validated
- Done
![]()
To get things set up even faster, feel free to copy this template for yourself.
One of the best features in Trello is the ability to filter down your cards by label. For bug tracking purposes, this categorization to work best:
- Critical
- Major
- Minor
- Trivial

The green to red label colors were chosen to represent the severity level of the bug reported.
Once you have your Trello board set up, make sure to invite your team (and clients) to your board. This will make it easy for everyone to report bugs.
Now, it’s time to create some cards!
Introducing Marker: How to Report Visual Bugs in Seconds
Whether you want to report a visual glitch, a typo, or a broken page, bugs are easier to communicate when you attach a visual element to them. The problem is that most screenshot tools out there are not designed for professional bug reporting.
The clunky process of screenshotting bug reports was one of the impetuses behind Marker, a powerful bug reporting tool for Trello.
Video link: (https://www.youtube.com/watch?v=ZBk6vSFUuC8 )
Depending on how you like to work, you can use Marker to attach screenshots on your Trello cards in two ways:
- Browse and attach existing screenshots inside your Trello card (Power-Up)
- Capture a screenshot from a website and send it immediately to a new Trello card.
Here’s how both methods work:
Method 1: Power-Up! Attach your Screenshots Inside Trello
To get started, you will need to activate the Marker Power-Up on your selected Trello Board. If you need more help with that, read the help doc.
Once your Power-Up is fully operational, you will be able to attach any screenshots taken with Marker onto your cards without ever leaving Trello. Simply click the ‘Marker’ button on your card and start attaching screenshots.

Any screenshots taken will automatically convert into a beautiful visual format on your cards.
If you need to get a bird’s-eye view of all your screenshots, you can even browse your entire Marker history inside Trello by selecting the ‘View All screenshots’ option.

For people who prefer to create bug reports directly from the website on which they are working, Marker offers another option to create Trello cards.
Method 2: Send your Screenshots Directly to Trello
This workflow is also very simple. Capture a screenshot, add annotations, and hit the ‘Create Card’ button!
Marker will take care of creating a new Trello card, attach the annotated screenshot to it and include all necessary technical data your team needs to understand the bug.
Here’s how to get started:
Step 1: Set up your Marker Account
First, you will need to have a Marker account to create Trello cards outside of Trello. Register for a free trial and then you can use it to access your own Trello account.
Step 2: Capture a Screenshot
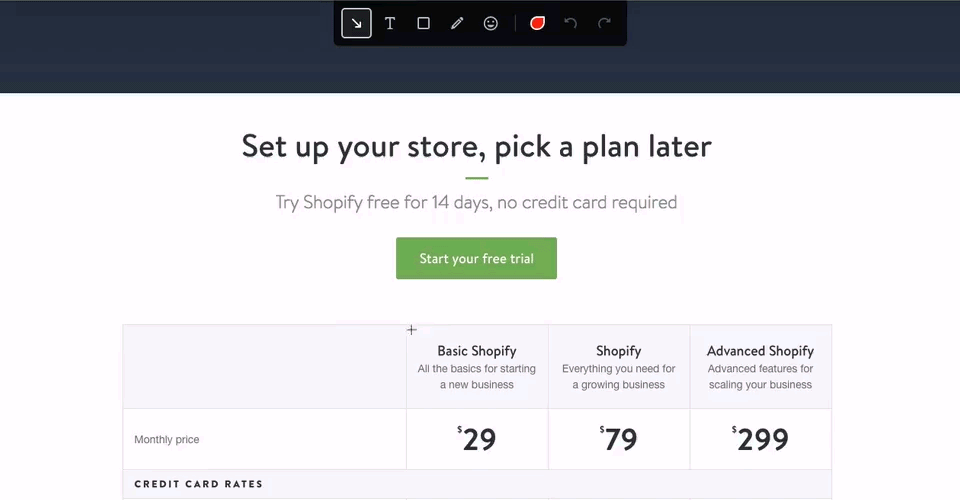
If you’ve ever annotated a screenshot (or used Paint back in the day), this step should seem familiar. Click on the browser extension and use the annotation tool to get your point across. In this example, you can request a correction to the dollar amount on this pricing page using an arrow and some explanatory text:
Step 3: Create Trello Card
To send a bug report in Trello, you’ll need to select where you want your Trello card to appear. Find your bug tracking board and the required list like this:

Note that Marker will remember your favorite board and list, so you don’t need to enter them each time.
Depending on how detailed you need your cards to be, you can add more Trello context to your screenshots. Click the “Add More” and Marker will automatically retrieve your team members and labels from any board:

Some developers won’t let you report bugs unless the actual and expected behaviors of the issue are well documented. If that’s your case, simply switch on the predefined bug reporting template and start filling in a short and structured description.
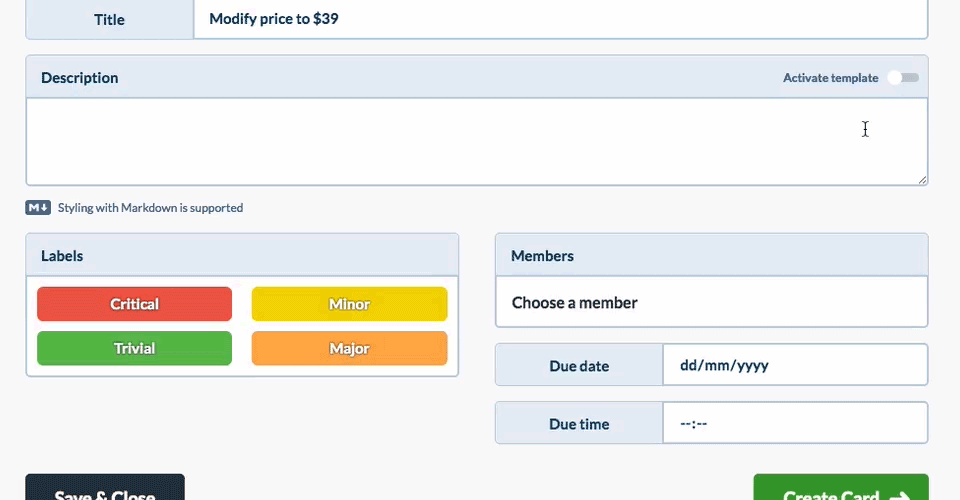
The description will be automatically converted using Markdown in your Trello card.
After you’ve defined which board and list you want to use and added additional context (optional), simply hit the “Create Card” button in Marker.
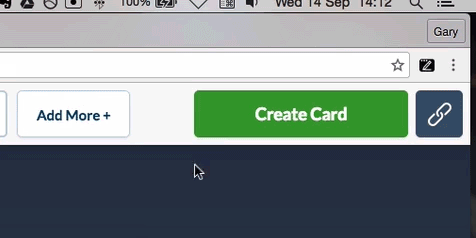
Your screenshot will be attached automatically to a new Trello card.
Step 4: Check your Bug Reports in Trello
When you send screenshots to Trello with Marker, a browser notification will confirm your card has been successfully created. Click on the notification to view your newly created Trello card. Here’s an example of a well-documented bug report with Marker. (See how professional this looks on your Trello board? It makes you look good, too!)

This Trello card has all the information needed for your team to act on it:
- The card is in the correct board and list.
- The card has a priority (using labels).
- The bug is assigned to a team member.
- The annotated screenshot is attached.
- The expected and actual results are well documented.
- The technical browser information is included.
- The URL where the screenshot was captured is in the description.
- The bug has a due date.
This professional bug report card was created quickly and easily without logging into Trello. Call that a context switching win!
Be Better With Bugs
Whatever web endeavor you set your sights on, reporting bugs will not be the most stimulating part of your job. It’s critical as project managers, testers, and designers, you can do it diligently, and without going nuts!
Setting up a Trello board to keep track of bugs and combining it with Marker to create powerful reports will set you up for success. You and your team will be able to report and process bugs much faster.
If you’ve read this far, give Marker a try and sign up for a 30-day free trial to set it up with Trello.
{{cta(’59a89363-69a4-4cb6-aeef-66be026d3c6d’)}}