Ever wonder how major news sites like Mashable, ReadWrite, and The Changelog keep their content pipeline flowing behind the scenes?
News flash: They use Trello.
Whether it’s a blog run by an individual or a humongous site with many contributors, Trello remains one of the easiest go-to tools for strategizing, planning, scheduling, and publishing blog content.
In what should come as a surprise to absolutely no one, we use Trello at Trello to manage our own extensive editorial calendar.
We welcome more than 750,000 unique readers to our blog each month and collaborate with many internal and external superstars to produce top-quality content on a weekly basis.
There are a lot of moving parts when managing a blog editorial calendar—due dates, author communication, SEO strategy, asset design, and more. So it’s of the utmost importance to develop a clear strategy and workflow to safeguard your editorial calendar from fire drills and chaos.
In this article, we’re giving you an inside look at our editorial calendar workflow in Trello. Follow this guide to create your own custom editorial calendar in a few easy steps so you can take any idea from potential pitch to successful, published blog post in style.
The Editorial Calendar Workflow At A Glance
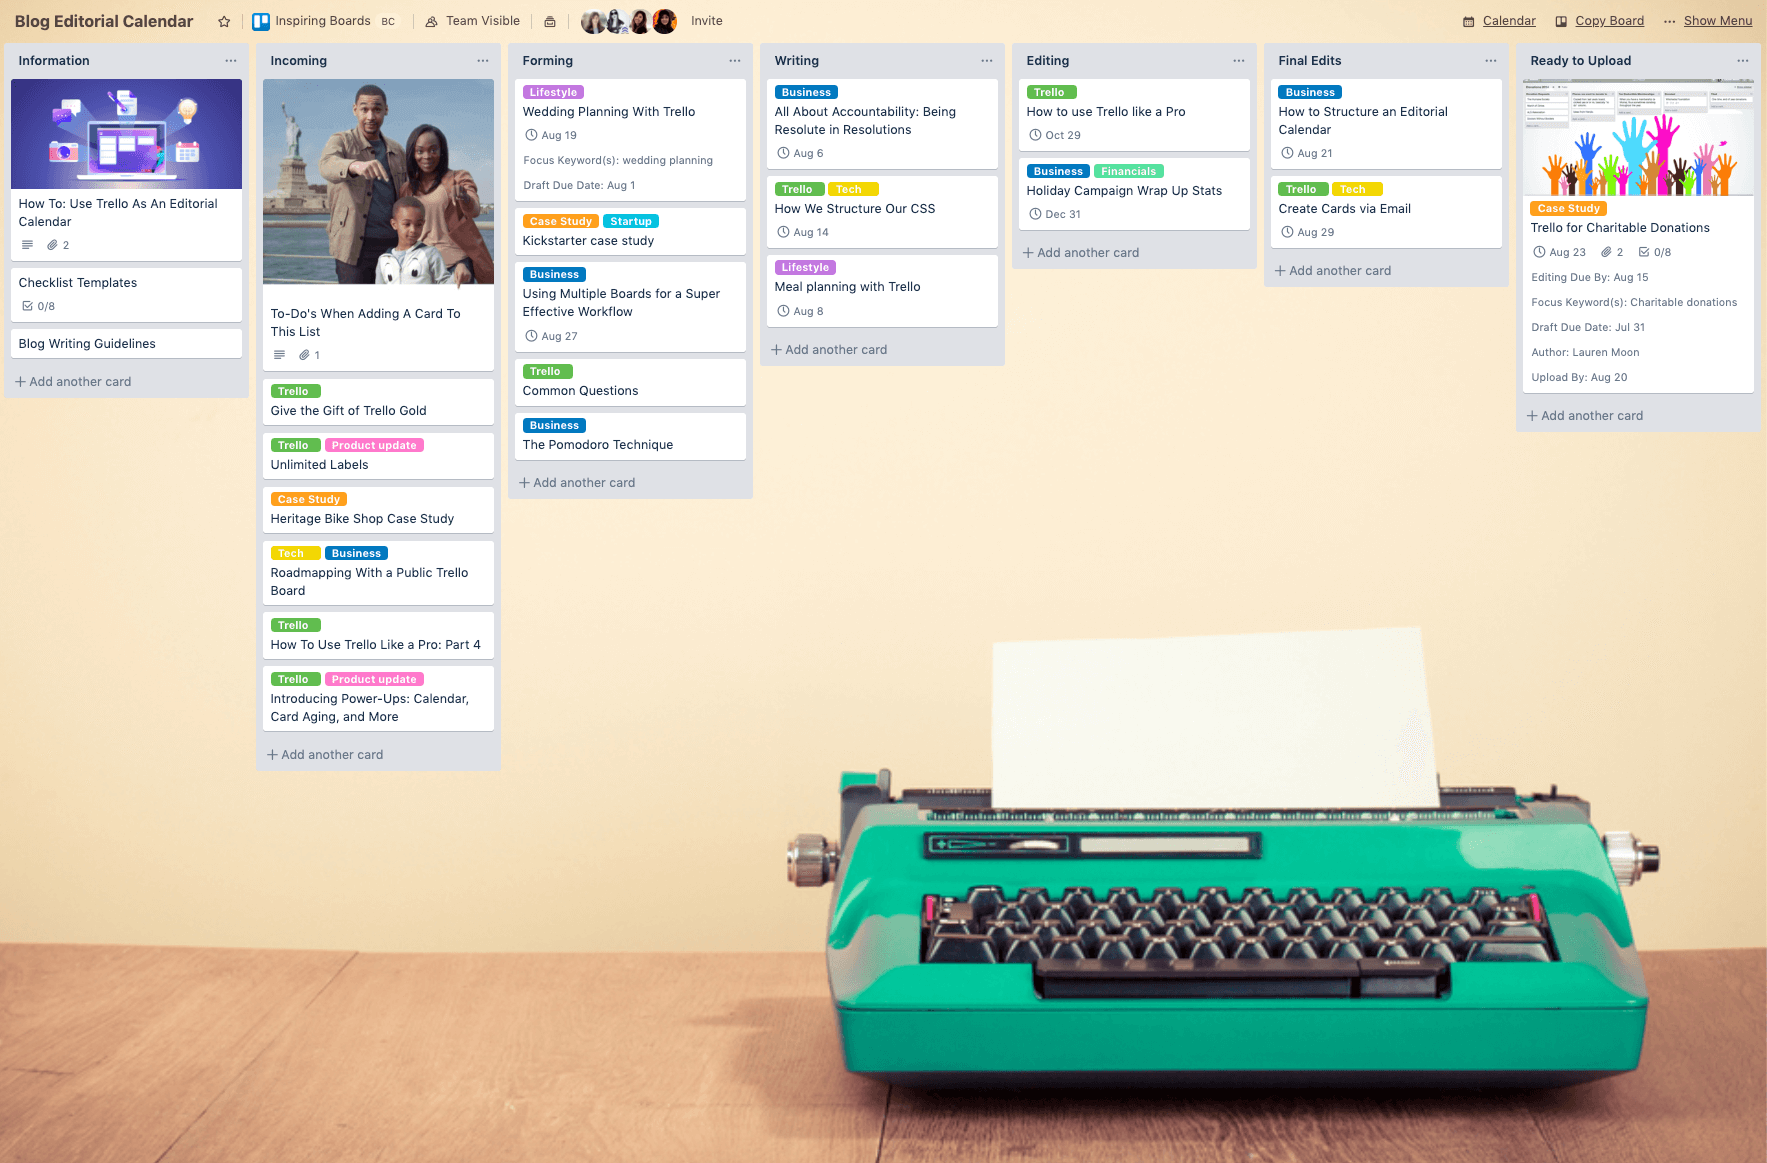
Before we dive into the details, let’s review our editorial calendar workflow.
Our editorial calendar Trello board follows a kanban workflow. Blog post ideas are added as cards to the Incoming list and journey through development stages from left to right across the board until they are published on the blog.
These are the lists on the board and their purpose:
- Information + Instruction: This list has several cards with important information and how-to’s in order to perform certain tasks throughout the ed cal process.
- Incoming: This is where ideas and pitches for articles are dropped in by team members, and are in consideration for the blog.
- Forming: This is the holding list where a potentially-approved topic temporarily lives because it may need more information and research before it can be assigned a due date.
- Writing: This list shows the blog posts that are being actively written.
- Editing: When a blog post is ready for review, the card is moved to this list for the first round of edits.
- Final Edits: This is where the author will commit final edits on the blog post based on the feedback in the editing process.
- Ready To Upload: When the blog post is finalized, it’s time to upload it to your website or blog tool. We use Hubspot to host our blog content.
- SEO Audit: Once the blog post is uploaded, this is when the post is analyzed for SEO and updated to rank highly online.
- Scheduled: This list identifies the blog posts that are scheduled to publish.
- Published: Congrats! The blog post is now live on the interwebs.
Now that you understand the high-level workflow of our own content calendar, let’s take a deeper look at the process and requirements at each stage of the process.
Dive Into The Editorial Calendar Details
Any blogger will admit that creating valuable content at a regular interval is difficult. Sometimes it’s hard to find the words to say… well, anything. This type of brain fog necessitates the need for an organized plan to hold writers accountable, centralize and flesh out ideas, as well as keep the content flowing at a steady clip.
Creating a Trello board for an Editorial Calendar is an intuitive and visual way to store, overview, and organize content.
Content travels from left to right across countless lists, gradually being poked and prodded through the pipeline until it reaches its final destination: The “Published” list. As outlined above, our Editorial Calendar lists are as follows, from left to right:
Incoming
This list is the start of our blog editorial workflow and where blog posts ideas are submitted for consideration from our freelancers and team members. We like to encourage everyone at Trello to come into the board and submit ideas!

Each idea is its own card, and on the back is a description of the potential idea. This is also where one (or three) labels get added, to further distinguish what type of content this article is categorized as, helping us ensure we have a balanced collection of topics and types of content each month.
✨Fun Fact: The Trello Editorial Calendar was one of the first boards to test the unlimited labels feature.
We also find it to be extremely helpful to provide guidelines to authors who want to pitch an idea. In the card at the top of the list (which stays there permanently), we have the following instructions listed for Incoming:

We take advantage of the Custom Fields Power-Up to standardize the information that we need for each pitch, including due dates, keywords for SEO, and the author.
Forming
When a blog post card is moved to this list, it means it is approved and the author can begin researching and writing the blog post (if they haven’t already!).
At this stage of the process, we make it a requirement to have a keyword for the blog post before it can move along the content creation pipeline.
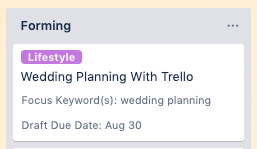
✨ Pro Tip: Remember those Custom Fields? They provide key info on the front of cards about the author, keyword, due date, editing due date, and more.
Writing
Usually these cards have a working draft attached, or at the very least a detailed outline. They also most certainly have a due date by now, as we schedule content at least a month in advance.
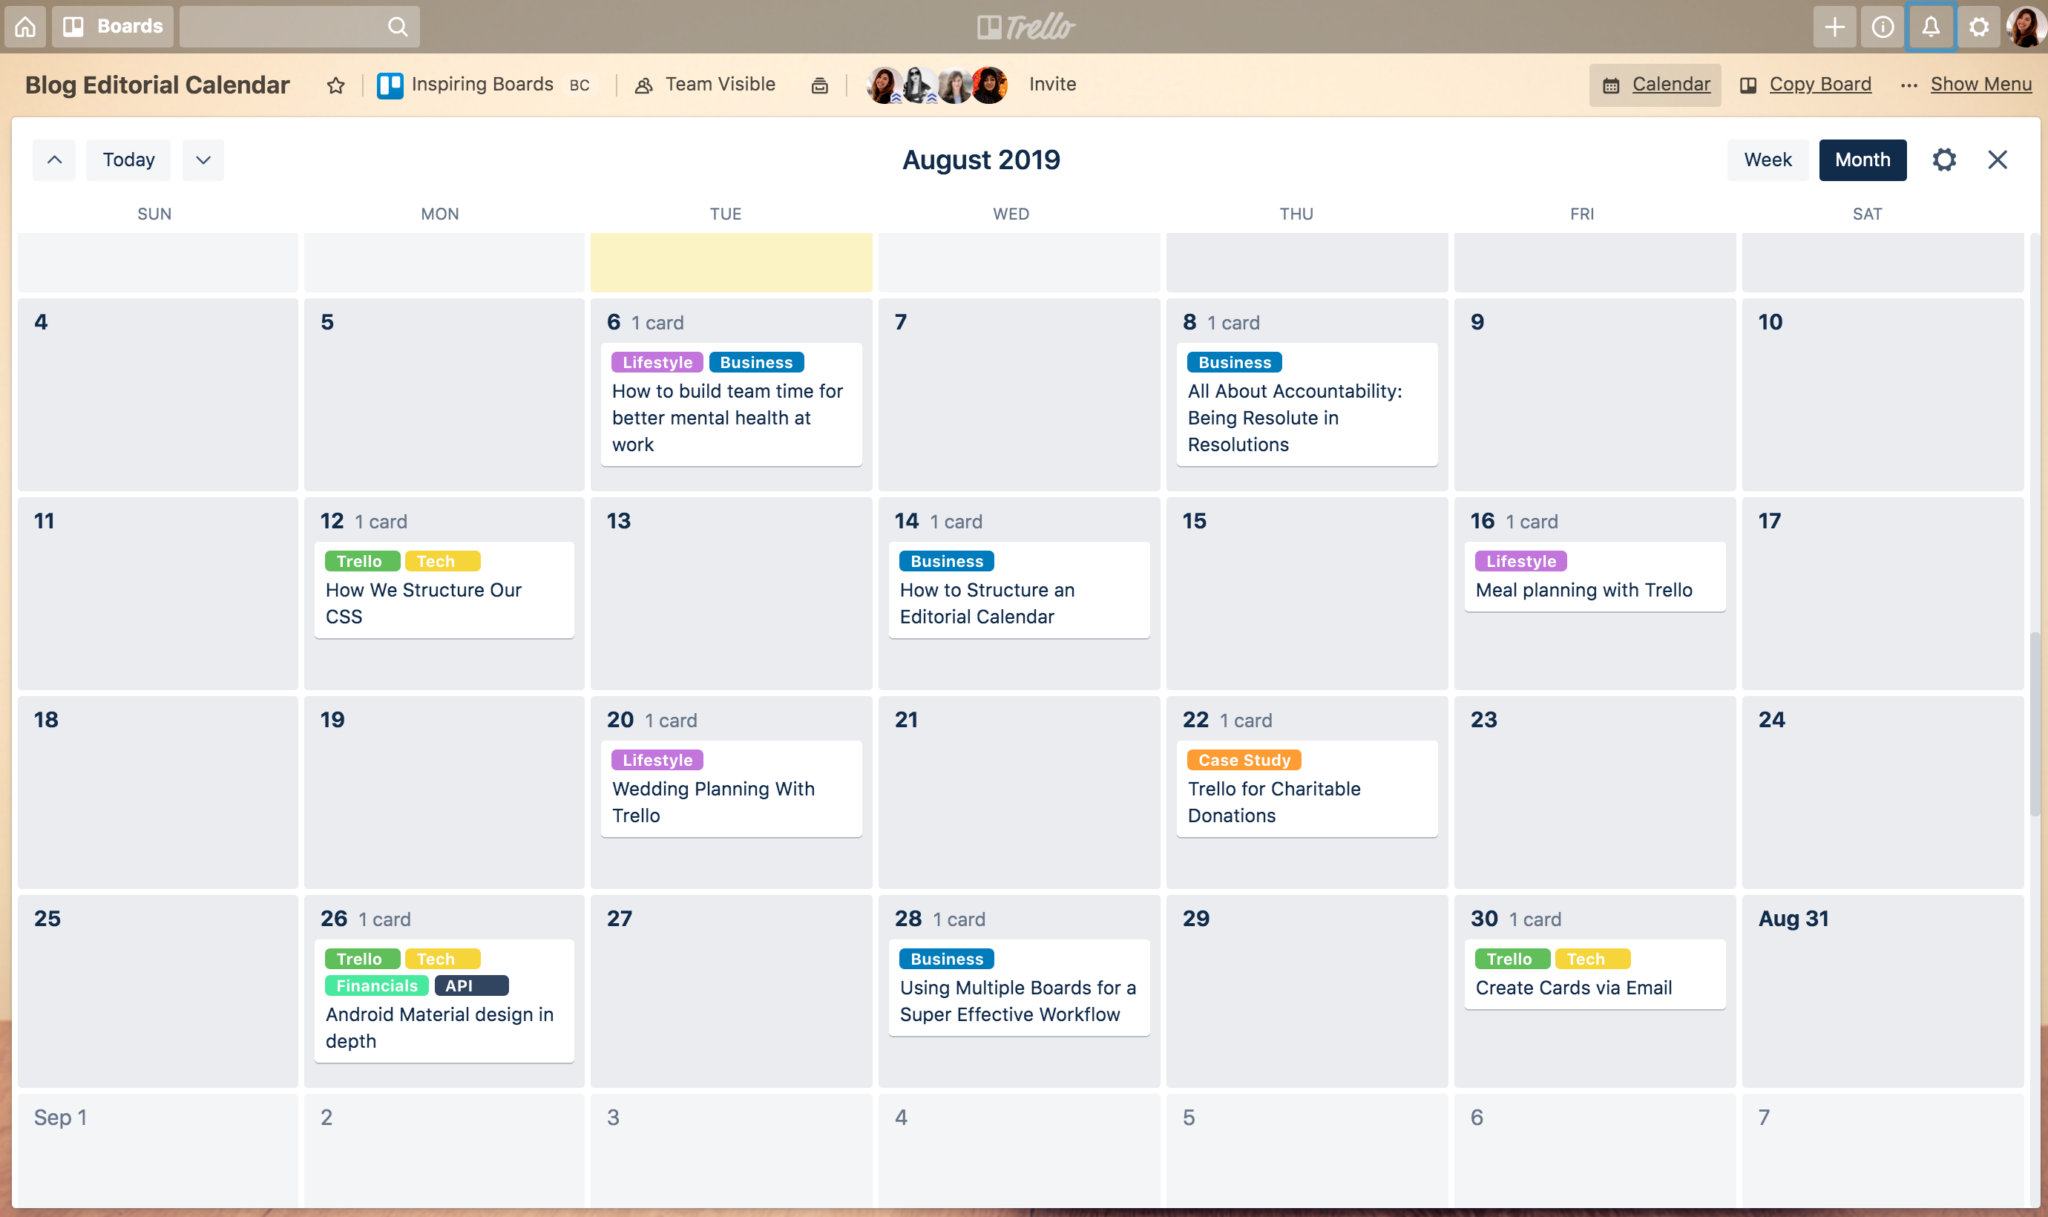
When deciding on a due date, it’s easy to visualize the content landscape in calendar view, thanks to the Calendar Power-Up. By selecting “Calendar” at the top right side of our board, we are able to see a breakdown of which cards are already scheduled and on which day. We typically aim to schedule 2-3 posts per week.
Also, if the author of the post has any questions for our team while they are writing, this is a great time to utilize the Comments feature in the card to chat about the draft so that everything is kept in one place.
Editing
Cards move here when it’s time for the resident grammar stickler (ahem, me) to look over the piece. We integrate with Google Drive to attach article drafts to our cards.
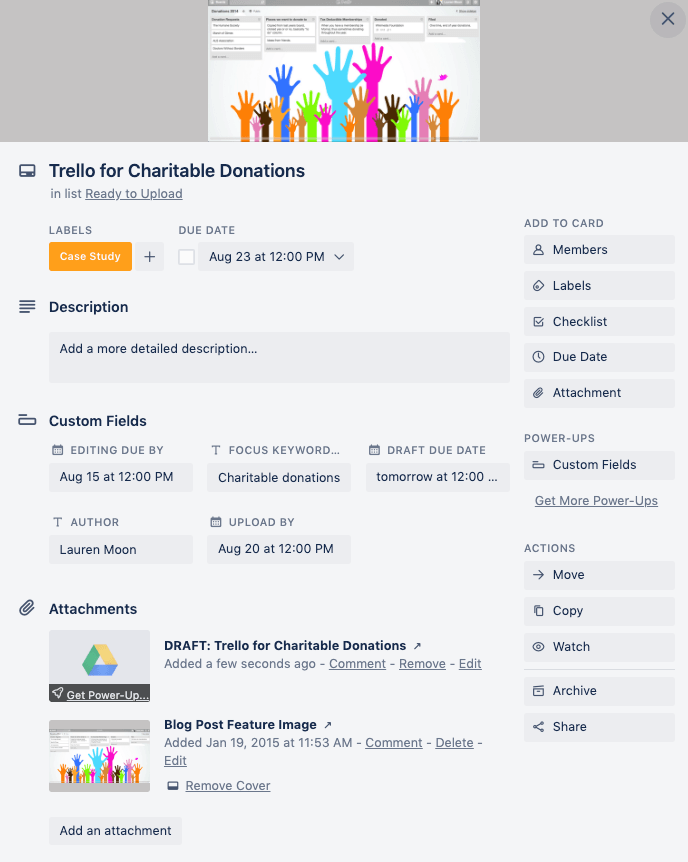
This is also the point in the process when we encourage the author to write several options for the title of the article and to assign the creation of the blog illustration to the Design team.
One of the most important and time sensitive elements of content management is ensuring that content gets in front of a designer with enough time for them to create graphics.
This isn’t always easy since there are far, far more graphics requests than there is time to complete them. Having a dedicated place where designers are notified there is a draft or outline ready for them to review is crucial to ensuring that graphics are thought out and complement the text nicely.
In other words, clear communication with other team members involved in the process is crucial to its success so make sure to give your Design team enough time to get their creative juices flowing!
✨ Pro Tip: Add screenshots, images, and GIFs as attachments to the card to save time and avoid scrambling later in the process when you’re uploading your blog post in your CMS system.
Final Edits
When the card is moved to this list, the author needs to be notified that any edits are ready to accept, and it’s finalize the draft.
Make sure all images, screenshots, and GIFs are attached to the card. We like the look of our editorial calendar when blog illustrations are set as the card cover. Make the blog illustration the cover of the card.
Ready To Upload
When a blog post is finalized (woo!), it’s ready to be uploaded to your website or CMS. At Trello, we use Hubspot, but you may use another platform like WordPress or Medium.
Regardless of the platform you use, we highly recommend writing out instructions for your team to follow when uploading blog posts so it’s completed properly.
✨ Pro Tip: Clunky images can slow down your page load speed and impact your search ranking ability. Before adding your images to the blog post, use www.tinyjpg.com to compress their size.
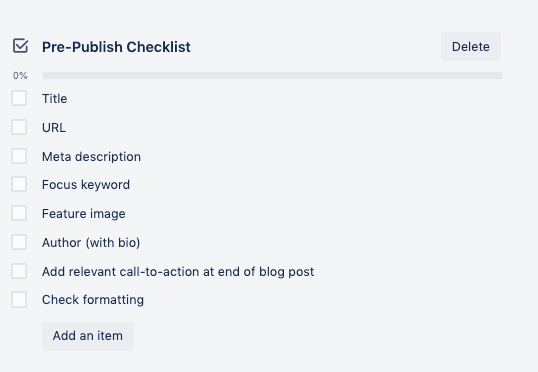
We use Checklist templates that are automatically added to the card thanks to some fun Butler rules when they are added to this list. As we are uploading blog posts and before we publish, we make sure that all items are checked off the list.
SEO Audit
Once a blog post is uploaded to Hubspot, we perform a final SEO review before scheduling and publishing the article. Here are a few things we check during our audit:
- Key information about the topic is clearly covered in the content, with an appropriate keyword density.
- All subtitles in the blog post are H2 tags and the keyword is in at least one H2 tag.
- All images are compressed and have clear alt text.
- The content is scannable with images, lists, spacing, and blockquotes, and looks well laid out on both desktop and mobile screens.
Scheduled
These articles are polished and ready to launch! Schedule the blog post according to your editorial calendar.
Published
Cue the confetti—The blog post is published! This list becomes a great repository of the research, drafts, files, and conversations behind every piece you ever publish.
You can even use the Trello app for Slack to send a notification to your editorial channel once the due date has been marked as done, to let your whole team know the post is now live.
So there you have it: an extremely straightforward, visual way to organize an inordinate amount of content.
There can be hundreds of cards in an Editorial Calendar, but having lists dedicated to each phase of the blog writing process deters feeling overwhelmed, and prevents content from getting lost in cluttered back and forth email correspondence.
The calendar view provides a visual overview of the content timeline, which means that every piece of the content management pipeline can live entirely on a Trello board.
A Few More Trello Features And Tricks That Add Delight To Your Editorial Calendar
A few pro tips are sprinkled throughout this article so you can add some excitement, and even ease, to your editorial calendar in Trello. Here are some more Trello tricks to add onto your board:
- Create checklist templates for easy reference. Create checklist templates so you can easily add them to your cards at certain stages of the ed cal process. Your whole team will know that every ‘i’ and ‘t’ have been crossed for each post by using a checklist for each stage. Store these checklists in a card under the “Information” list on the board.
- Jazz up your board with card covers. Need to catch someone’s eye or just want to add some flare to your board? Use card covers! Simply add an image or GIF to the card as an attachment and set it as the cover.
- Voting Power-up for the Incoming list. Make decision-making process easy when discussing what to push through the pipeline with the Voting Power-Up. See right on the card front which topics your team likes the most and start writing!
- Cut through the clutter with Filters. Go to Show Menu > Search Cards > Select your name. This filter feature will only show the cards you are assigned and/or working on!
- Stay organized and ahead of schedule with a weekly editorial calendar meeting. If you work on a team to manage your blog content calendar, set up a standing meeting each week to review the workflow and calendar. This will keep the team accountable from reviewing pitches to removing any bottlenecks in the process. Even if you’re an editorial team of one, schedule time in your calendar each week to review the calendar, schedule new pitches, follow-up with writers, and organize your task list to move those posts to be published.
- Find faults in the flow? Change it up! Our editorial calendar has grown and changed as much as Trello has over the years. The best part about it is that we can easily create or remove lists, try different stages, add more checklists, and keep it evolving to suit our needs. No matter what, our team is on the same page about what’s being worked on.
The hood is pulled back and now you have an inside look as to how blog posts are ideated and produced here at Trello. Copy the board below and make this workflow your own:
Editor’s Note: This article was originally published in January, 2015 but has been updated with a whole heap of new information and ideas.
Good or bad, we’d love to hear your thoughts. Find us on Twitter (@trello) or write in to support@trello.com.
