


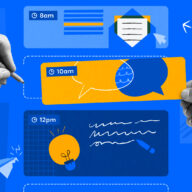


Whether or not you’re a productivity powerhouse, chances are someone has tried to give you some advice on how you can be more efficient or accomplish more in your day. Perhaps you heard that if only you woke up a few hours earlier, or if you added meditation into your morning routine, or if you started time tracking your activities… THEN you could be a productivity super machine!
The truth is that there are no universal productivity truths. In fact, just about every piece of productivity advice is at least somewhat subjective.
There’s just no advice that each person in the world can apply and get the same results. We’re not all morning people! Sometimes forcing yourself to wake up earlier isn’t actually going to help you accomplish more. It just depends on the individual and how their brain is wired.
So should you ignore all productivity advice? No! Instead, you should take it all with a grain of salt and test it out for yourself to see if it helps you… yes, specifically YOU, be more productive.
You can start by creating small experiments based on productivity advice you find. This is what Chris Bailey, author of the Productivity Project, did when he graduated from college. Instead of immediately jumping into the workforce, he took some time to learn about how he worked best. And he found that some cliché productivity advice didn’t actually apply to him at all.
If you want to try to conduct your own productivity experiments, keep reading this handy post to see how you can do it, and how Trello makes it extremely easy!
How to Conduct Productivity Experiments
If you’re not sure how to run an experiment, let’s refer to the scientific method.
You start with a hypothesis, define a baseline/benchmark to start operating from, test your hypothesis and measure the results, then see if the experiment improved over the results of the baseline.
We’ll do the same thing with our productivity experiments!
1.) Start by creating a baseline
How productive are you now? Of course that’s a little bit of a subjective concept, but here’s a few ways to make it more tangible.
You can measure things like the percentage of your to-do list you accomplish each day. You can give yourself a score on a scale of 1-10 for your level of focus, attention, or energy. Your mood can even be an indicator of your productivity. The number of tasks you accomplish on a given day/week can be a measure as well (you just have to make sure you structure it accordingly so that each task is roughly worth the same amount of value… i.e., you wouldn’t want one task to be writing up a complete final report and another task to be checking the mail).
You can also measure things like the number of times you were distracted. Feel free to get creative and think through ways to tell if you’re being productive or not.
Note: I do not recommend tracking number of hours you work. Productivity is not about spending more time working, but rather about accomplishing more work in less time.
2.) List out some common productivity advice you want to test (your hypotheses)
Next, list out anything you’ve ever wanted to try to see if it helps you be more productive. Some things that you could test include….
- Waking up earlier
- Reducing your caffeine intake
- Using pomodoro timers
- Working with background music (like Brain.fm)
- Standing while working
- Working out in the middle of the day
- Starting the day off with your hardest task first (eating the frog)
- Tracking your time
- Only checking email at specific times of day
3.) Start trying them—one at a time—and measure the same metrics you recorded in your baseline.
Whatever you decided to measure in your baseline, you need to now measure those things again as you start new experiments. When you test out standing while working, you need to see how that compares to your baseline.
Also, only test one productivity experiment at a time so you can get an accurate read for what’s working. If you skip that morning coffee and also start working out in the middle of the day, you won’t know which one is actually helping you be more productive. (In science-speak, this is called “controlling your variables”).
In an ideal situation, you would be able to have a perfect test each week by doing the same work, in the same place, with the same interactions with people, the same resources, and the only thing that’s different about your week is one thing… like if you consumed caffeine or not. Of course, this isn’t realistic. You’ll have different tasks and working conditions no matter how much you control your environment. Just do the best you can to really try to narrow down the things that are impacting the way you work.
Also, since you want to conduct this like a scientific experiment, you can’t try an experiment for just one day and expect to see results. That would be too small of a sample size. (A sample size is the amount of data you have about a given item that you’re testing.)
If you have only tested avoiding caffeine for one day, you might feel like it’s effective, but it’s hard to predict if that will happen again tomorrow. However, if you have no caffeine for a week and are more productive, then it’s more likely that you will be able to skip your coffee breaks and experience more productivity in the future.
4.) Analyze performance against the baseline.
Try out as few or as many experiments as you want!
You’ll likely find that some have a small impact on your productivity, some have a big impact, and some have none at all. You might even find that some actually make you less productive! Just keep trying different experiments, control your variables as much as possible, and compare what you find to your baseline. Then stick with the activities that you find have the most impact.
What Does Trello Have To Do With Productivity?
Now you know how to test it, but what’s the best tool to do this in?
Well, not that I’m biased… but I’m going to recommend Trello. And here’s why.
Trello is a perfect tool to do everything I just described. While you could technically track your experiments in a Word document or a Google Sheet, it’s not as easy to organize items in those tools. Plus, the name-of-the-game here is being able to easily see what is working and what’s not.
On top of that, it’s incredibly easy to do. I’ve set up some more advanced boards in my time … and this isn’t one of them!
To start with, just create a board for your Productivity Experiments. (You can follow along with a live example of mine here.)
All you need are three lists:
- Create one to list out all the ideas of things you want to test
- One to track what you’re currently testing
- One more to keep up with what you’ve completed testing and your results!
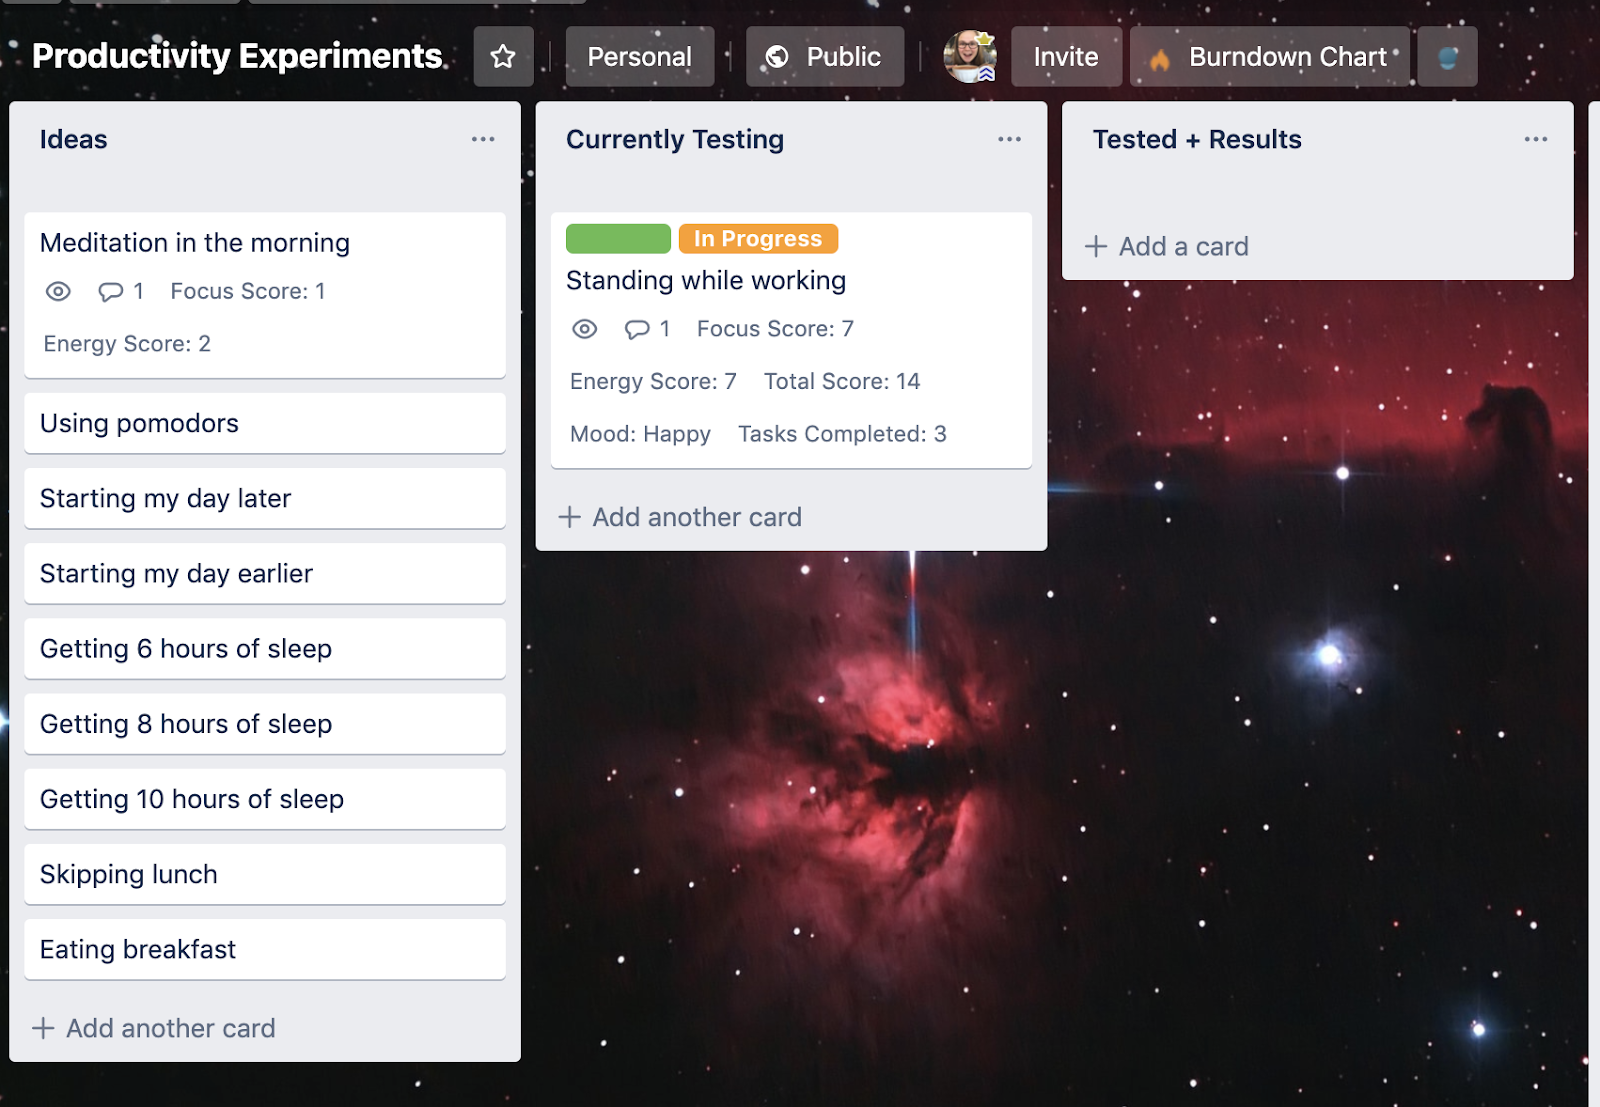
Next, create a card for each item that you want to test. I listed several earlier in this post, but feel free to check out my board for more inspiration.
Once you’ve created some cards, I recommend adding the Custom Fields Power-Up to keep track of the info you want to track for each experiment. Creating custom fields is easy!
Just click the Custom Fields Power-Up inside of a card, click “New Field” and name it, then select the type you want it to be. You can see some examples of the ones I’ve created.

Notice that you have additional fields that you can update and view for each card on your board! And yes, you can even see them on the card cover without having to open up the card!
Now you’ve got the perfect set up, just move cards over one at a time into testing, record your results, and when you’re done, move over to your final list!
It’s easy to see at a glance which experiments led to increased productivity, and therefore which ones you should stick with, and which ones you should leave to other productivity enthusiasts.
Advanced Tips and Tricks with Butler Automation
Okay easy enough, but if you want to supercharge your board… there’s more!
I used this opportunity to start playing around with Butler and seeing what cool pieces of automation I could use to make this board even better. If you’re not familiar with Butler… here’s more information about what it is and why you might want to learn more about it.)
The way Butler (and just about any other automation tool) works is that you set criteria (also known as a trigger), and an event to happen when the criteria are met (also known as an action).
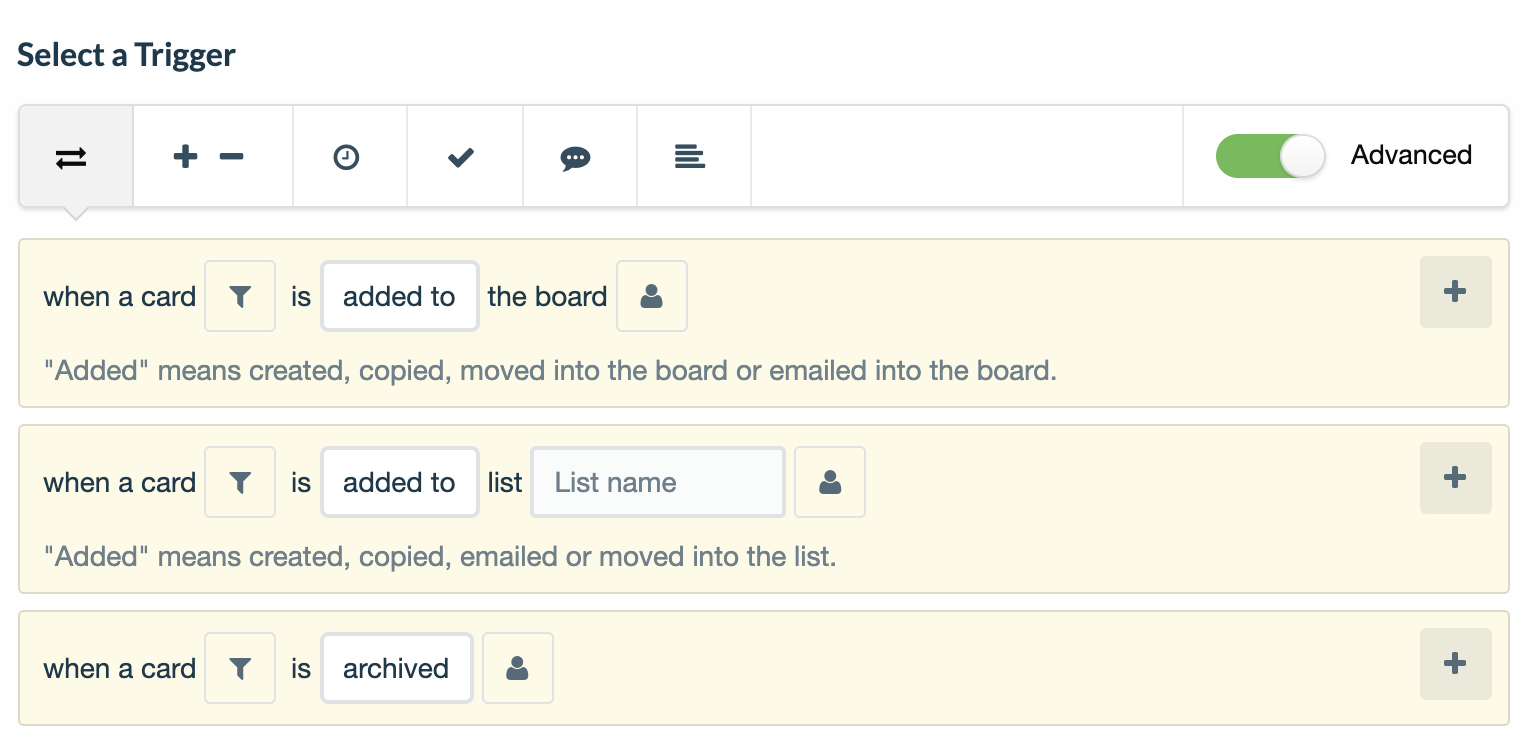
Butler offers you many options for creating a trigger, for example:
- When cards are added or moved to certain places
- People or labels or attachments are added to a card
- When a due date is coming up
- When checklist items are completed, and….
- When things happen in custom fields!
Once you select a trigger, you then define an action you want to take place.

Again, there are just as many options (if not more) for actions as there are for the triggers! If you can dream it, it’s probably on here. (And if it’s not, you might be able to find a creative way to make it happen anyway!)
Here are some fun Butler rules I decided to try on my board.
While playing around with automation on this board, here are some ways I found to make my productivity tracker even more useful.
1.) Update labels when moving a card into another list.
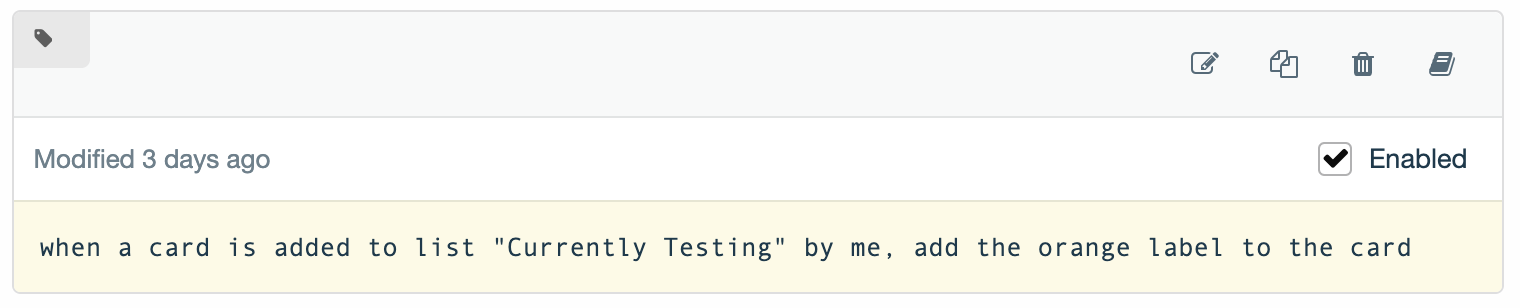
I like labels because they make my board look nicer, but they also make it easier to filter cards on a board.
I’m using labels to indicate when an experiment is in testing, but you can use labels for anything and make Butler rules that fit with them!
2.) Sort cards by results
I created a custom field on my cards called “Total Result” which is the averaged value of all the other fields. This gives me one number to gauge the success of an experiment. With Butler, I can create a board button that lets me sort all the cards in a list by highest-to-lowest Total Score, thus letting me see all my cards in order of most effective to least effective.

3.) Add colored labels for positive experiments (and negative ones)
Another way to quickly identify successful experiments is by creating a Butler rule that adds a green label to cards with “positive” results when criteria are met (like energy score being greater than 5, or mood being Happy).

I also set up a rule to add a red label for “negative” experiments.
This will make it easy to view successful experiments and failed ones by filtering the board or just glancing through labels.
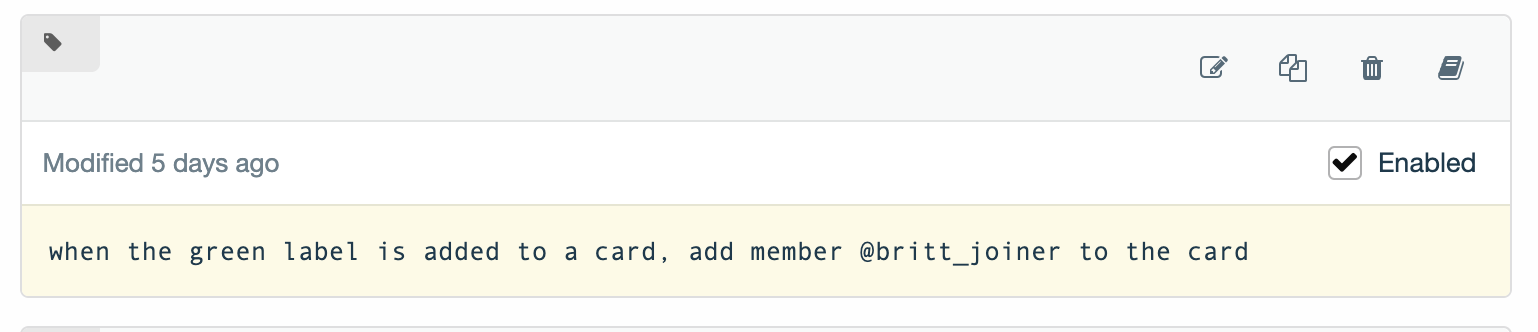
4.) Tag someone when a label is added
Let’s say that I have a friend who is following my productivity experiments and wants to try out my successful experiments for herself. Butler can tag a person on a card when a certain label is applied (or other actions!)
I’m using the criteria of when a card gets a green label (see previous rule which explains why that means it’s a good experiment) to add someone to that card.
5.) Set up reminders to fill in criteria.
I am also using Butler to automatically set a due date so I remember to update my card with notes about my experiment (such as updating my custom fields).
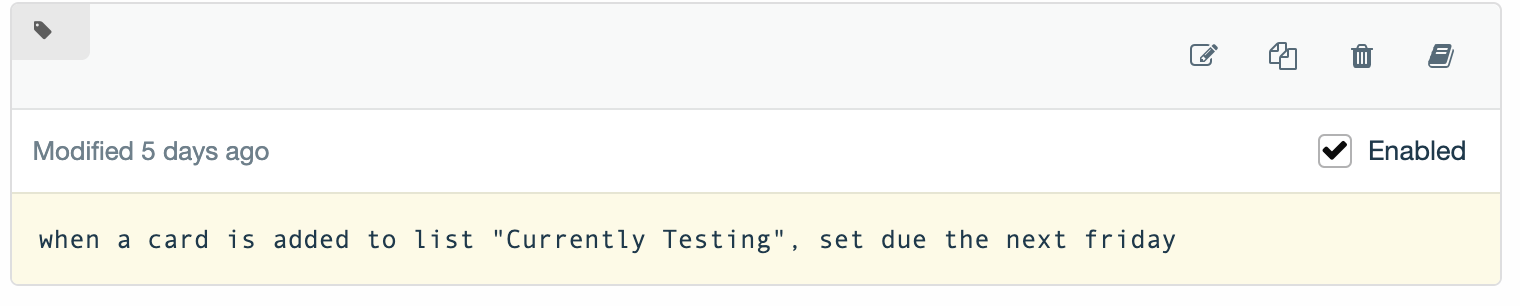
I made a rule so that once I move a card into “Currently Testing”, it automatically applies a due date to it. I get a notification reminder to update that card at the end of the week.
6.) Add your to-do tasks into the same board and track how much work you get done with each experiment
There are a couple of rules and new lists I used to implement this.
First of all, I added two new lists to my board. “Tasks for the Week” and “Tasks Complete”. At the start of each week, I can list out specific tasks, like “Write a blog post” or “Reach out to list of influencers” etc.
Note: To be able to tie these cards to experiments, I go into each task and attach the card that relates to the experiment I’m working on for the week. (For example, this week I’m testing standing up while I work, so that card would be attached to all my tasks for this week. This is important for being able to use Butler to automate some actions for tracking work done during these experiments!)
And then when those are complete, I can move those tasks over to “Tasks Complete” and increment a number in a custom field on my experiment card.
Here are a few rules I set up to make that happen.
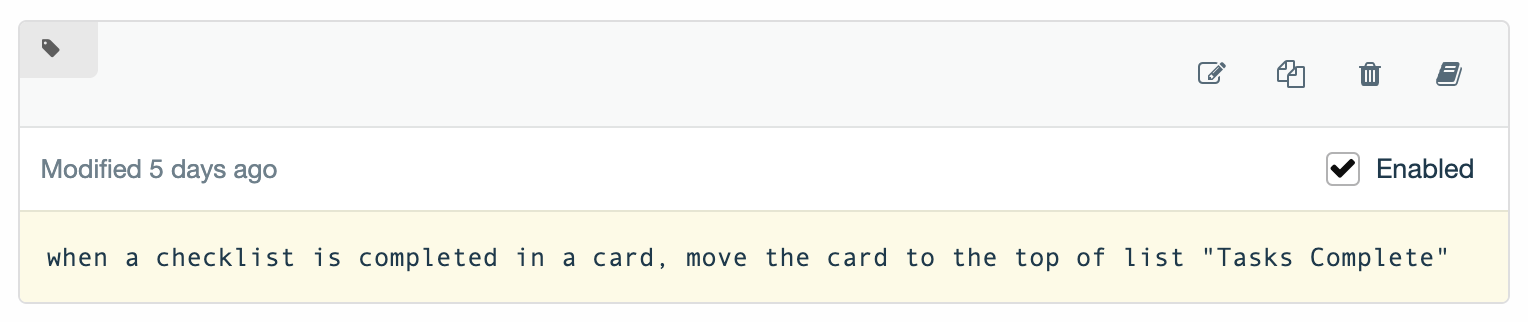
I start by adding small checklists of tasks within a task card, to help me break it down into steps and see how much I accomplish. Once all of the items in the checklist are complete, Butler will move the card over to my “Tasks Complete” list.

This rule says that once a card is moved to “Tasks Complete,” it finds the attached card (the experiment) and updates a custom field on that card called “Tasks Completed” by 1.
So, essentially every time a task is completed, it tracks it on the experiment card. You can then compare how many tasks you accomplish with each experiment.
(Of course, to make this as objective as possible, each task should be roughly the same amount of work and value. Otherwise, one week could have a low number of tasks completed, but actually took more work because it was a larger task.)
Track Your Productivity With Trello And Butler
Ready to try Butler and Productivity Experiment tracking out for yourself? Give a try and see what other cool things you can try out with this concept!
If you have more ideas, or questions about implementing this, check out the Trello community! It’s a fun place where we share things we’re trying and ask questions all about Trello! I’d love to see you over there.